Parallel Processing – Send or Insert?
One of the most common questions that new music producers have is whether they should apply special effects, such as reverb and delay, to elements of their mix with an insert or a send.
That said, what’s the difference between a send and an insert? What are the benefits of using one over the other, and does it even matter which one you choose? We’ll answer all these questions and more in this post!
A send, which is also sometimes referred to as an “aux,” is a track that is separate from the audio track that holds the audio that is being processed. Sends only hold the processed version of whatever element you’re trying to process.
You can make use of a send by routing your vocals to a vocal reverb send, for example. On that send, you would have a reverb plug-in of some kind with its mix knob set to 100% wet, or 100% processed. From there, you would be free to process the vocal reverb independently from the vocal itself.
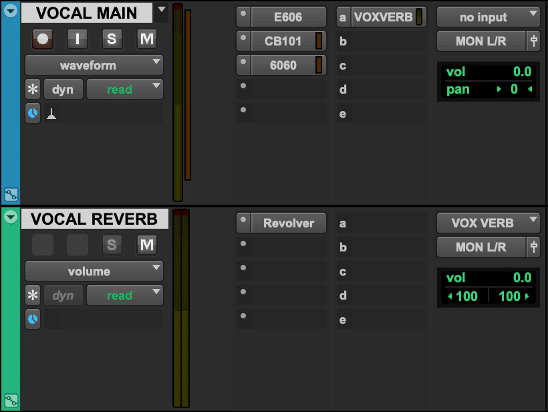
Sending a Vocal to a Reverb Aux Track
Does the reverb get a bit too muddy, but the low end in the vocal itself sounds fine? Apply a high-pass filter to the send without worrying about how it’ll affect the vocal track. Want to saturate your vocal reverb but not your vocal? Use a saturation plug-in after your reverb plug-in on your send and you’re good to go.
As you can see, making use of sends offers tons of flexibility!
Now, let’s say we wanted to apply a vocal reverb to a vocal without using a send. In this case, we would need to put the reverb plug-in directly on the vocal track as an insert. From there, instead of dialing the mix knob all the way up to 100% on the reverb, we would need to play around with the mix knob to make sure we don’t overpower the vocal with the reverb.
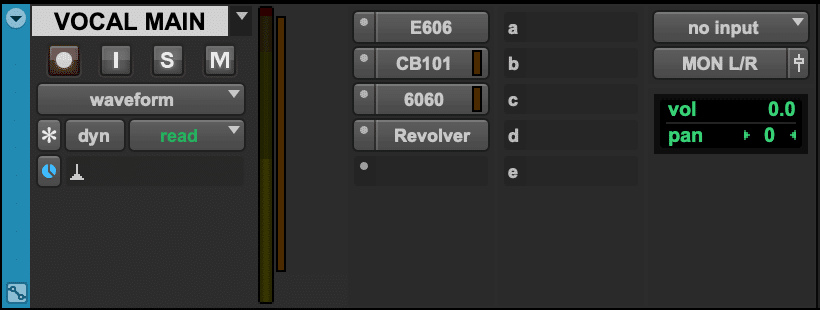
Applying Reverb as an Insert
Perhaps the biggest difference between using a send an insert is that, when using an insert, the changes you make will also affect the vocal itself. For example, if you turn up the mix knob on an insert, the dry vocal will get turned down to make room for the processed sound. On the other hand, altering the mix knob on a send wouldn’t affect the volume of the track being routed to the send at all.
When You Should Use a Send Instead of an Insert
Like we mentioned before, using a send offers quite a bit more flexibility than an insert does. This is particularly true when you’re working with a plug-in that doesn’t have a mix knob, like a saturation plug-in, for example. Route the track to a send, use the send’s fader as a mix knob of sorts to balance the dry signal with the processed signal, and you’ve basically made your own mix knob!
Another reason you might want to choose a send over an insert is if you plan on routing multiple elements of a mix to the same processing. For example, you might want to send your snare and kick drum to the same reverb. A send is perfect for this application because it helps you save CPU power and it also makes it easier to tweak the reverb in the future, as you’ll only have to adjust one plug-in as opposed to two.
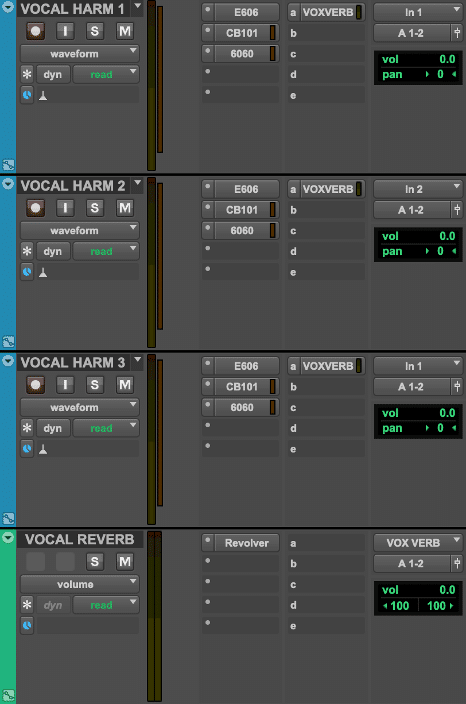
Sending Multiple Tracks to the Same Reverb
When You Should Use an Insert Instead of a Send
There are some situations in which it makes a lot more sense to use an insert instead of a send. For instance, let’s say we’re doing a sound design session with some experimental processing that we likely won’t be applying to any other elements of our production. Using an insert makes much more sense in this case because it leaves all your processing in one place and, if desired, you can print all your processing very easily.
Another situation in which you might want to use an insert instead of a send is if you’re working with an artist that wants processed multi-tracks for all the elements in their song. Printing tracks that include special effects, like reverb and delay, is much easier to do when these effects are applied directly to the track, whereas doing this with a send would likely require some extra routing.
How You Can Do Both with the McDSP 6060 Ultimate Module Collection
Well, technically it’s not possible to use one plug-in as both a send and an insert at the same time, but the McDSP 6060 Ultimate Module Collection’s Split Mode feature is about as close as it gets!
The 6060 allows you to take the best aspects of using a send (such as processing independently from the dry signal), the best aspects of using an insert (such as easy printing), and puts them all together. The best part is that it’s incredibly easy to use, so let’s talk about how it works.
In the screenshot below, the 6060’s Split Mode feature has been enabled by clicking on the “I” button on the MEF1 module in slot 3. Now, the signal feeding into the 6060 is being sent down two signal paths: signal path A and signal path B. All modules to the left of the MEF1 module are being routed through signal path A, all modules to the right of the MEF1 module are being routed through signal path B, and the MEF1 module itself is being routed through signal path B.
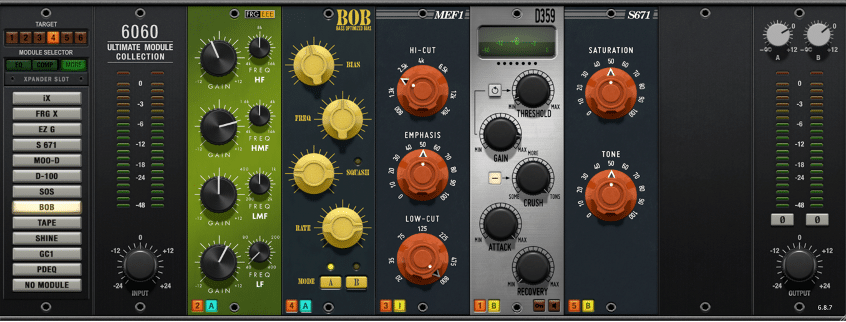
The McDSP 6060 Ultimate Module Collection
Additionally, notice the two volume knobs at the top right of the plug-in’s interface. These knobs grant us very easy control over the two signal paths. Want to hear more of signal path B? Turn up the knob labeled “B.” Want to hear more of signal path A? Turn up the knob labeled “A”!
Want to check out the 6060 for yourself? Try out a free 14-day, fully functional 6060 Ultimate Module Collection trial
here.As always, we hope you learned something new! Be sure to sign up for our newsletter below to stay up to date on all things McDSP. We’ll see you next time!