Being able to add width to any sound is an important skill to have. However, it isn’t easy to do when you’re dealing with a source that has been recorded in mono. Enter the Haas Effect. This technique can be just what you need to add a bit of width to a more subtle element in your production.
But what is the Haas Effect and how do you create it? In this post, we’ll be answering these questions and more!
The Haas Effect is a basic stereo widening effect that involves duplicating a signal, shifting the duplicated signal out of time with the original by a few milliseconds, then panning one to the left and the other to the right.
Have a look at the screenshot below for a visual representation of the Haas Effect:
Manually Creating the Haas Effect
Manually creating the Haas Effect is very simple. In your DAW of choice, duplicate the track that has the sound you want to apply the Haas Effect to. Now pan the original 100% to the left, pan the duplicate 100% to the right (or vice versa, it doesn’t matter), then drag the audio on one of the tracks so that it is slightly out of sync with the other track.
This is where it can be fun to experiment! Try moving them out of sync by different amounts, panning them by different amounts, slightly pitch shifting one side, etc. until you come up with something you like.
When You Shouldn’t Use this Method
Although the Haas Effect can be quite useful, there are a few situations in which you might want to consider an alternative, especially if you’re using the above manual method to create the effect.
For example, let’s say you’re mixing some guitars that weren’t double tracked, but nevertheless occupy a significant role in the arrangement. In this case, the Haas Effect could cause issues with mono compatibility. When the song is played in mono, you would likely hear unwanted phasing artifacts coming from the guitars because their waveforms would be slightly out of sync with one another.
The best way to get around this is to use a delay plug-in to create the Haas Effect instead of creating it manually! That’s because most delay plug-ins include a mix knob that makes it very easy to stay away from mono compatibility issues. By turning the mix knob down, you’re blending the center of the stereo field back in with the left and right sides that the delay plug-in is creating. This center reinforcement should be just enough to keep mono compatibility at bay, we’ll touch more on this later in this post.
As an example of what this phasing might sound like if you don’t use the mix control fix we mentioned above, we’ve included some examples below. The first clip is the original, unprocessed snare sound, the second is a stereo bounce of the same snare with the Haas Effect on it, and the last clip is the same snare again but this time summed to mono. Notice the strange phasing effect on the third clip:
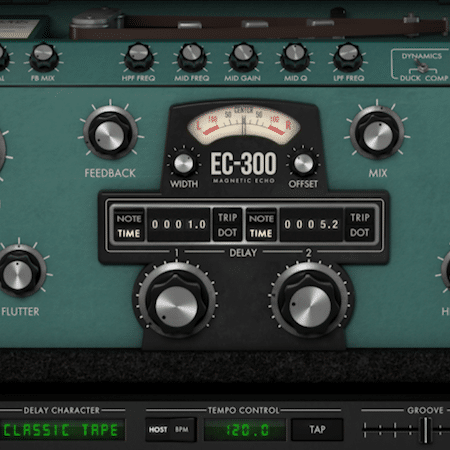
Method 2: The McDSP EC-300 Echo Collection
The McDSP EC-300 Echo Collection Plug-In with Haas Effect Settings
As previously mentioned, there are tons of benefits to using the EC-300 plug-in to create the Haas Effect. All you have to do is set the plug-in’s Delay Mode to Dual, turn the feedback down a little bit (or don’t!), and make sure the delay time knobs are set to Time instead of Note. From there, dial back one of the Delay Time knobs to 1ms, and then dial the other knob to a very low value that is slightly higher than that of the other knob (pictured above).
By using the EC-300 to create the Haas Effect, you’re opening yourself up to all the tonal possibilities that are included within the plug-in. With its saturation control and SIM section, you can experiment with making the tone of the Haas Effect more distorted and unique! Take it one step further by experimenting with all the included modulation controls.
You can also use the delay plug-in’s mix knob to counteract the potential mono compatibility issues we discussed earlier. Either use the delay plug-in as a send with the mix knob all the way up, or dial it in to taste right on the track with the mix knob dialed back a bit. Mess around and see what happens!
Lastly, when you’re dialing in the delay time knobs, keep in mind that the human ear starts to hear two distinct sounds when there is about a 30msec difference between them. As a result, if you want this effect to be particularly subtle, try making sure the time difference between the two knobs is less than 30msec.
If we’ve piqued your interest, check out the audio files below (which were created from the same snare you heard earlier) that will give you a great idea of what the EC-300 is capable of. You can also find a screenshot of the settings we used for this example below.
The McDSP EC-300 Echo Collection with Settings from the Example Below
We even included a version of the processed audio that’s summed down to mono, which shows that you can use the EC-300 to create the Haas Effect without running into mono compatibility issues! In order to do this, we simply dialed back the mix control to retain the center portion of the stereo image.
We hope you learned something new! Be sure to sign up for our newsletter below to stay up to date on all things McDSP. We’ll see you next time!